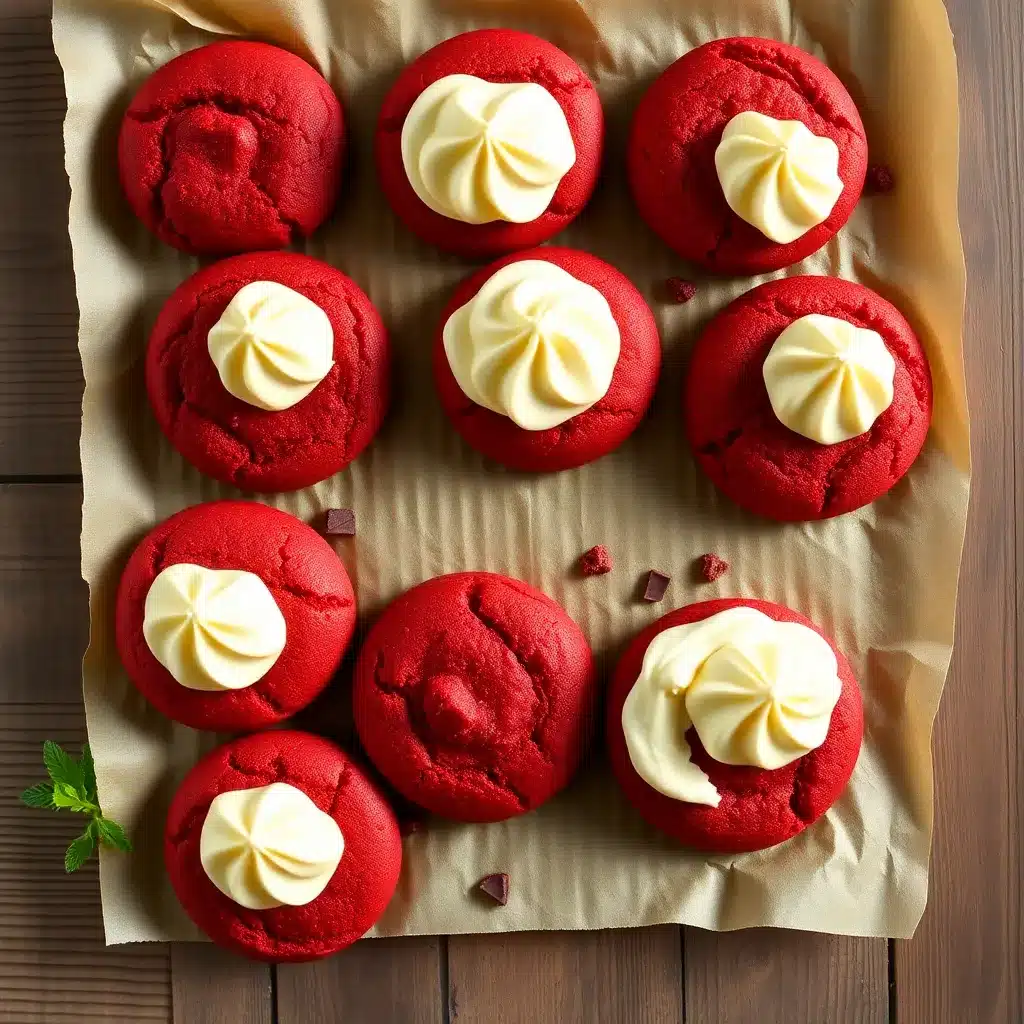
Red Velvet Cupcake Cookies always pull people in with their sheer name. It’s like two desserts crash into each other and come out in a form that feels both nostalgic and brand new. I remember the first time I baked them, my kitchen smelled like a bakery and a candy shop had collided, and honestly—it was kinda perfect.
Red Velvet Cupcake Cookies bring that iconic tangy cocoa flavor of red velvet cake but crunchier on the outside, softer in the middle. They’ve got that rich scarlet hue that makes people stare a second longer. And when topped with cream cheese drizzle or a swoop of frosting, well, you basically just made a cupcake wear a cookie costume.
Ingredients & Substitutions
Red Velvet Cupcake Cookies start with flour, the backbone. All-purpose flour works fine, but if you want chewier, stronger cookies, go bread flour—extra gluten means extra bite. Pastry flour will tilt it delicate, but it can get fragile fast.
Red Velvet Cupcake Cookies lean on cocoa powder for depth. Use natural cocoa if you want that sharp, earthy cocoa kick. Use Dutch-process if you want smoother, darker, more luxurious notes. Never go low quality here—the cocoa is small in weight but huge in taste.
Red Velvet Cupcake Cookies also depend on red food coloring. Gel color is best, liquid can throw off your dough hydration. If you hate artificial color, beet powder works, though it’ll mute the vibrancy and give a tiny earthy undertone. Some bakers mix hibiscus powder for a natural red pop.
Red Velvet Cupcake Cookies need sugar balance. Granulated white sugar gives structure. A little brown sugar sneaks in chewiness and a caramel undertone. Don’t skip the pinch of salt—it’s the flavor sharpener that keeps the cookie from being flat.
Red Velvet Cupcake Cookies require fat—softened butter, always. Unsalted, so you control salt levels. But if you only have salted, just reduce the extra pinch. For dairy-free folks, coconut oil solidified works, but the flavor shifts tropical. Vegan butters with high fat percentage can sub in too.
Red Velvet Cupcake Cookies want eggs. They bind, they fluff. Room temperature is non-negotiable, unless you like weird dense hockey pucks. A flaxseed egg works for vegan versions, though texture leans more cakey.
Red Velvet Cupcake Cookies scream for tang. Buttermilk is traditional in cakes, so here we cheat: a splash of vinegar or lemon juice added to milk, stirred in with dry ingredients. It keeps that signature red velvet tang alive.
Red Velvet Cupcake Cookies finally need cream cheese. Whether as a drizzle, frosting, or filling swirl, it’s what makes red velvet taste like red velvet. Use block-style cream cheese for baking, not whipped tubs—they’re too loose.
Step-by-Step Instructions
Red Velvet Cupcake Cookies start with dry mixing. Flour, cocoa, salt, baking soda—whisk until no clumps. Cocoa hides sneaky lumps that don’t dissolve mid-bake, so sift if you can.
Red Velvet Cupcake Cookies next need butter and sugar creamed. Don’t rush it. Creaming is what gives you air pockets that translate into lift. A stand mixer makes this easy, but even a wooden spoon works if you’ve got patience (and forearms).
Red Velvet Cupcake Cookies then ask for eggs one at a time. Room temp eggs beat in smoothly, cold eggs curdle the batter—nobody wants that mess. After eggs, add vanilla, vinegar, and your red food coloring. The dough should look like velvet paint before flour joins in.
Red Velvet Cupcake Cookies move on to flour addition. Fold in gently—overmixing activates gluten and toughens cookies. Dough should be thick, not sticky, and scoopable with a cookie scoop. If it feels dry, a spoon of buttermilk saves it.
Red Velvet Cupcake Cookies now bake. Line sheets with parchment, scoop dough mounds with space between (these spread). Bake at 350°F (175°C) until edges firm but centers still soft. About 9–11 minutes, but ovens are liars—watch color and smell, not just timers.
Red Velvet Cupcake Cookies cool before frosting. If you frost too soon, cream cheese melts into goo. Cool completely, then pipe, drizzle, or dollop. Some bakers sandwich two cookies with frosting, creating a hybrid whoopie pie.
Red Velvet Cupcake Cookies can twist with mix-ins. White chocolate chips melt into pockets of sweetness. Crushed Oreos fold in for crunch. Or go classic—no extras, just cookie plus frosting.
Cooking Techniques & Science
Red Velvet Cupcake Cookies depend on the creaming method. Creaming butter and sugar traps tiny air bubbles. During baking, those expand with steam, creating lift. Skip creaming properly, you’ll bake flat saucers.
Red Velvet Cupcake Cookies use cocoa and acid science. Cocoa naturally leans acidic, but Dutch-process is treated to be neutral. That’s why vinegar or lemon is added back in—to react with baking soda, to lighten texture, to keep color bright. The acid is not optional.
Red Velvet Cupcake Cookies use chilling tricks. Chilling dough firms fat, so cookies spread less and bake thicker. Even 30 minutes in the fridge makes a noticeable difference. Overnight chilling deepens flavor as starches hydrate fully.
Red Velvet Cupcake Cookies play with food coloring chemistry. Natural reds like beetroot change to brown if pH isn’t acidic enough. That’s why vinegar matters again—it keeps the red red. Gel food color bypasses this science, but the tradition remains.
Red Velvet Cupcake Cookies need the right tools. A cookie scoop ensures uniform size and even baking. Parchment prevents sticking and keeps bottoms golden instead of scorched. A cooling rack is not just fancy—it prevents soggy bottoms from trapped steam.
Serving & Pairing Suggestions
Red Velvet Cupcake Cookies shine when frosted. A thick cream cheese swirl with a touch of vanilla extract, powdered sugar, and a pinch of salt turns them bakery-level. Or drizzle for a lighter touch—less messy, still indulgent.
Red Velvet Cupcake Cookies plate beautifully stacked. Sprinkle with crushed freeze-dried raspberries for color contrast. Or dust with powdered sugar to mimic snowfall on crimson velvet. Small details make them irresistible for parties.
Red Velvet Cupcake Cookies pair best with drinks that balance tang. Cold milk cuts richness. Hot coffee emphasizes cocoa. A latte with cinnamon plays off the tang and adds warmth. For holiday spreads, mulled wine or spiced cider beside these cookies feels almost theatrical.
Red Velvet Cupcake Cookies also travel well. Pack in parchment-lined tins, separating layers with wax paper to avoid frosting smears. They hold up better than cupcakes in transit but still deliver the same dramatic flavor.
Conclusion
Red Velvet Cupcake Cookies prove desserts don’t need to stay in their own lanes. They steal the best parts of cupcakes—the frosting, the tender crumb—and bake them into cookies with chew, crunch, and portability. They’re playful, nostalgic, and yes, a little dramatic in color.
Red Velvet Cupcake Cookies reward bakers who respect science. The acid balance, the cocoa choice, the creaming method—skip one and you notice. But when all steps align, the payoff is striking cookies that taste as rich as they look.
Red Velvet Cupcake Cookies are perfect for holidays, birthdays, or just that Tuesday when life feels too beige. Keep your frosting tangy, your dough chilled, and your cocoa top-notch. The rest falls deliciously into place.
FAQs
Can I make Red Velvet Cupcake Cookies without food coloring?
Yes, you can. Use beet powder, hibiscus, or skip color altogether. The flavor remains, but the iconic red hue won’t be as bold.
Why do my Red Velvet Cupcake Cookies come out flat?
Usually, it’s from not chilling dough, or from overmixing after adding flour. Another culprit is butter too warm—solid fat is needed for structure.
Can I freeze Red Velvet Cupcake Cookies?
Absolutely. Freeze the dough balls raw for up to 2 months, bake straight from frozen with 2–3 extra minutes. Or freeze baked cookies (without frosting) and thaw before icing.
Do Red Velvet Cupcake Cookies need cream cheese frosting?
Not mandatory, but strongly recommended. The frosting’s tang defines red velvet’s identity. Without it, they’re just cocoa cookies with red paint.
How do I keep the cookies soft for days?
Store in airtight containers with a slice of bread tucked inside. The bread sacrifices its moisture, keeping the cookies chewy longer.

Olivia P. is a seasoned food blogger at Tastywink, sharing delicious, easy-to-follow recipes inspired by him passion for home cooking. With years of culinary blogging experience, he brings flavor, creativity, and a personal touch to every dish.